Showing posts with label AL11. Show all posts

Thursday, May 12, 2022

Details About Smart forms in SAP ABAP

Details About Smart forms in SAP ABAP

Smart forms are used to design the business documents such as purchase order, sales order, 

invoice, Performa etc.

Smart forms are introduced from 4.6c version onwards. It also supports output mode as ‗EMAIL‘.

Components of Smart forms:

1. Smart form layout.

2. Function module.

3. Print layout.

Components of the smart forms layout:

1. Global settings.

2. Pages and windows.

Components of Global settings:

1. Form attributes

2. Form interface

3. Global definition

Form attributes:

Form attributes contain header information i.e.

Form name

Language 

Page format 

Created by…………..

Form interface: this is used to declare the variables, work area and internal tables which we need to 

transfer the data from print program to layout.

Global definition: this is used to declare the variables, work-area and internal table which are used to 

implement the logic in the layout.

PAGES: page is the physical area where we place the window. We can‘t print the text in the page.

WINDOWS: we can place the same window in ‗n‘ number of pages but we can‘t print the data directly 

on the window.

Procedure of Smart Form:

1. Based on the client requirement we design the smart form layout by using SMARTFORMS t-

code.

2. After activating the smart form it generates a function module.

3. Based on the function module we develop the print program.

NOTE: Printing the data on the page window is always through symbols.

There are four types of symbols.

1. Program symbols

2. System symbols

3. Standard symbols

4. Text symbols.

Each symbol starts with ‗&‘ ends with ‗&‘.

How to create Function Group in SAP

 Steps to create Function group:-

 Execute SE37.

 In the menu bar – goto – function groups – create group.

 Provide your function group name.

 Provide short description.

 Save – local object.

Steps to activate the function group:-

 Execute SE37.

 In the menu bar – environment – inactive objects.

 Expand your function group.

 Select your function group.

 Click on activate (in ECC 6.0 – select function group – right click – activate).

Components of the function module:-

1. Attributes.

2. Import.

3. Export.

4. Changing.

5. Tables.

6. Exception.

7. Source code.

Monday, April 25, 2022

How to create Function Group in SAP ABAP.

Steps to create Function group:-

 Execute SE37.

 In the menu bar – goto – function groups – create group.

 Provide your function group name.

 Provide short description.

 Save – local object.

Steps to activate the function group:-

 Execute SE37.

 In the menu bar – environment – inactive objects.

 Expand your function group.

 Select your function group.

 Click on activate (in ECC 6.0 – select function group – right click – activate).

Components of the function module:-

1. Attributes.

2. Import.

3. Export.

4. Changing.

5. Tables.

6. Exception.

7. Source code.

Create Table step in SAP ABAP

Create Table step in SAP ABAP. 

Steps to create the Emp table by using Top-down approach data type. 

element:-

 Execute SE11.

 Select the radio button database table.

 Provide your table name (YSPRAO_730_Emp1).

 Click on create – enter.

 Provide any short meaningful description (Emp table by using Top-down 

approach).

 Provide delivery class (a).

 Select the maintenance allowed.

 Click on the fields tab.

 Provide the field name (Eid) & data element name which is not there 

(ZZSPRAO_730_Eid).]

 Double click on the data element – save before editing – yes – local object –

cerate the data element – yes.

 Provide a meaningful description.

 Provide domain name which is not created (ZSPRAO_730_Eid).

 Double click on domain – save before editing – yes – local object – yes. 

 Provide a short description, data type & length.

Eid ZZSPRAO_730_Eid.

  Save the domain.

 Check the domain.

 Activate the domain.

 Come back.

 Save the data element.

 Check the data element.

 Activate the data element.

 Come back.

 Repeat the same for all the fields

Steps to create Data element in SAP ABAP.

Steps to create Data element in SAP ABAP. 

 Execute SE11.

 Select the radio button data type.

 Provide your data element name (YYSPRAO_730_Eid).

 Click on create – enter.

 Provide any short meaningful description (id of the emp).

 Provide domain name which is already created – enter.

 Save the data element.

 Check the data element.

 Activate the data element.

 Repeat the same procedure for all the data elements

SCRIPTS IN SAP ABAP.

 SCRIPTS IN SAP ABAP. 


It is the integrated text management system of SAP. The output of  scripts and normal report will be same. But formatting is very easy using scripts. Usually scripts are used for external purpose and reports are used for internal purpose. When specific format is required in output we go for scripts.


In scripts we require layout set and print program. Layout set is used for designing the output. That is page designing is done here. For this Transaction code is SE71 (form painter).

Print program is used for writing the logic to get the data from data base. It is an executable program which is written in SE38 T-code.


Attributes of form painter (SE71)

Header

Pages

Windows

Page windows

Paragraph Formats

Character Formats

HEADER:- It contains Basic settings and administrative data. Administrative data gives history of the form and basic settings gives technical information about the form.


PAGES:- It is a logical memory area where output is formatted. It is a repository of pages.


WINDOWS:- I t is a place on the page where output or data is formatted. Page has to be divided into windows in order to hold the output. We cant format the output outside the windows. Windows  is repository of windows.


Paragraph formats and Character formats are used for alignment or beautifying the output.


SESSION METHOD IN SAP ABAP.

SESSION METHOD IN SAP ABAP. 


Differences between call transaction and session method.


In call transaction updation is immediate but in session method updation is not immediate.

In call transaction user has to handle errors but in session system handles the errors.

In call transaction updation can be synchronous or asynchronous or local but in session method updation by default synchronous.

Call transaction returns sy-subrc value but session will not return sy-subrc value.


In session method the data will be stored intermediately in session. After processing the session only the data will be moved into data base. For processing the session the T-code is SM35.


SESSION:- It is an intermediate memory area where data with flow logic is stored. It is intermediate between internal table and data base table. A session can not be processed on the date on which it is created. A session can not be processed if it is processed successfully. If session is having error it can be processed any number of times.


In session method we have to use 3 function modules.

BDC_OPEN_GROUP

BDC_INSERT

BDC_CLOSE_GROUP


BDC_OPEN_GROUP: -  This function module is used to create a session with particular name.


BDC_INSERT:-  This function module is used to move flow logic and data into session. This function module should be called between the loop and endloop after recording steps.


BDC_CLOSE_GROUP:- This function module should be used to close the session. If this function module is not used the session will be created but we cant process the session.

Thursday, July 23, 2020

Send Mail Excel attachment program in SAP ABAP

Send Mail Excel attachment program in SAP ABAP.


DATA: lt_mailrecipients  TYPE STANDARD TABLE OF somlrec90 WITH HEADER LINE,

      lt_mailtxt         TYPE STANDARD TABLE OF soli      WITH HEADER LINE,

      lt_attachment      TYPE STANDARD TABLE OF solisti1  WITH HEADER LINE,

      lt_mailsubject     TYPE sodocchgi1,

      lt_packing_list    TYPE STANDARD TABLE OF sopcklsti1 WITH HEADER LINE,

      gv_cnt             TYPE i.


Add Recipients


lt_mailrecipients-rec_type  = 'U'.

lt_mailrecipients-com_type  = 'INT'.

lt_mailrecipients-RECEIVER  = 'someone@erpdb.info'.

APPEND lt_mailrecipients .

CLEAR lt_mailrecipients .


Put in the Mail Contents


lt_mailtxt = 'Hi How are you'.      APPEND lt_mailtxt. CLEAR lt_mailtxt.

lt_mailtxt = 'Here is a test mail'. APPEND lt_mailtxt. CLEAR lt_mailtxt.

lt_mailtxt = 'Thanks'.              APPEND lt_mailtxt. CLEAR lt_mailtxt.


Create the attachment


  DATA: BEGIN OF lt_po_data_cons OCCURS 0,

         ebeln LIKE ekpo-ebeln,

         ebelp LIKE ekpo-ebelp,

        END OF lt_po_data_cons.


  SELECT ebeln ebelp INTO TABLE lt_po_data_cons

  UP TO 10 ROWS

  FROM ekpo. 


  CLASS cl_abap_char_utilities DEFINITION LOAD.

  CONCATENATE 'PO' 'PO Line'

              INTO lt_attachment SEPARATED BY

              cl_abap_char_utilities=>horizontal_tab.

  APPEND lt_attachment. CLEAR lt_attachment.


  LOOP AT lt_po_data_cons.

  CONCATENATE lt_po_data_cons-ebeln lt_po_data_cons-ebelp

              INTO lt_attachment SEPARATED BY

              cl_abap_char_utilities=>horizontal_tab.


  CONCATENATE cl_abap_char_utilities=>newline lt_attachment

              INTO lt_attachment.


  APPEND lt_attachment. CLEAR lt_attachment.

 ENDLOOP.

Pack the mail contents and attachment

 lt_packing_list-transf_bin  = SPACE.

  lt_packing_list-head_start  = 1.

  lt_packing_list-head_num    = 0.

  lt_packing_list-body_start  = 1.

  lt_packing_list-body_num    = LINES( lt_mailtxt ).

  lt_packing_list-doc_type    = 'RAW'.

  APPEND lt_packing_list. CLEAR lt_packing_list.


  lt_packing_list-transf_bin  = 'X'.

  lt_packing_list-head_start  = 1.

  lt_packing_list-head_num    = 1.

  lt_packing_list-body_start  = 1.

  lt_packing_list-body_num    = LINES( lt_attachment ).

  lt_packing_list-doc_type    = 'XLS'. " You can give RAW incase if you want just a txt file.

  lt_packing_list-obj_name    = 'data.xls'.

  lt_packing_list-obj_descr   = 'data.xls'.

  lt_packing_list-doc_size    = lt_packing_list-body_num * 255.

  APPEND lt_packing_list. CLEAR lt_packing_list.


  lt_mailsubject-obj_name     = 'MAILATTCH'.

  lt_mailsubject-obj_langu    = sy-langu.

  lt_mailsubject-obj_descr    = 'You have got mail'.

  lt_mailsubject-sensitivty   = 'F'.

  gv_cnt = LINES( lt_attachment ).

  lt_mailsubject-doc_size     = ( gv_cnt - 1 ) * 255 + STRLEN(

  lt_attachment ).

Finally, send the mail out.

CALL FUNCTION 'SO_NEW_DOCUMENT_ATT_SEND_API1'

    EXPORTING

      document_data              = lt_mailsubject

    TABLES

      packing_list               = lt_packing_list

      contents_bin               = lt_attachment

      contents_txt               = lt_mailtxt

      receivers                  = lt_mailrecipients

    EXCEPTIONS

      too_many_receivers         = 1

      document_not_sent          = 2

      document_type_not_exist    = 3

      operation_no_authorization = 4

      parameter_error            = 5

      x_error                    = 6

      enqueue_error              = 7

      OTHERS                     = 8.

  IF sy-subrc EQ 0.

    COMMIT WORK.

    SUBMIT rsconn01 WITH MODE = 'INT' AND RETURN.

  ENDIF.

Wednesday, February 26, 2020

AL11 ,CG3Y, CG3Z, CACS_FILE_COPY, download and copy and delete file application server in SAP .


SAP ABAP  AL11 ,CG3Y, CG3Z, CACS_FILE_COPY  details.

AL11 ,CG3Y, CG3Z, CACS_FILE_COPY  details.
AL11 T-Code meanly used for the controlling to store file in the application server. All the file directories you can see in the AL11 .This step can be done in AL11 transaction for uploading, downloading and deleting files.
Below are details step you can see.
Uploading a file in Al11 Directory in SAP.
Step 1: Located the file location in which we have to upload the file.


Step 2: Next->GO to-> CG3Z this is for uploading the file in AL11 directory.

Step 3: Write you’re the source location for file from the front end system and the target file location in the AL11 directory. Next you click Upload Button.


·         When you transfer your file this Transfer file format for Data ( by default, it is set to BIN for Binary)
·         If you want overwrite file check this checkbox.

·         This is the below message will be display.

Now directory will contain the uploaded file.

You can see text file will be uploaded.


Next step is downloading a file from AL11 directory in SAP.
Step 1: At first you select your file which you want to download in your local system.

Step 2: Next ->>GO TO->> CG3Y.


Step 3: You write your source location and the target location where you can store your file after you click on download button.


When you’re downloaded successfully you can get below message.


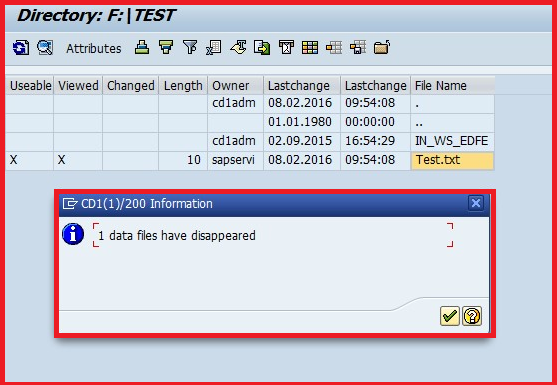
Next step is deleting a file in AL11 directory in SAP.
Step 1: Go to àSE37, after enter Function module name EPS_DELETE_FILE after click on the execute button.


Step 2: Next ->put your file name and file path-> FILE_NAME and the directory path in the DIR_NAME and execute.


After you get  deleted successfully message.


SAP Copy File with CACS_FILE_COPY in SAP.
This T-Code CACS_FILE_COPY is very helpful also.
If you want to copy File Application to Presentation Server and Presentation to Application. This time you can use This T-Code CACS_FILE_COPY SAP Standard.


First you set your Copy direction
·         Application To Presentation Server
·         Presentation Server to Application
And set your file source and file destination details.